Create Custom Toolbars


Category: [Excel] Demo Available
Create Custom Toolbars
Create Custom Toolbars in Excel & Attach Them to Excel Workbooks
The toolbars in Excel can be easily manipulated to allow a user to customize their own toolbar. This is great for situations where there is a shared workbook used by multiple users. Each user can easily customize their own toolbar with their preferred buttons and built-in menus and even create their own menus and place them on the toolbar. Users can then show only their own personal toolbar when using the shared workbook. If you wish, you can customize a toolbar and attach it to a workbook so that the toolbar shows every time the workbook is opened.
CREATING A CUSTOMIZED TOOLBAR
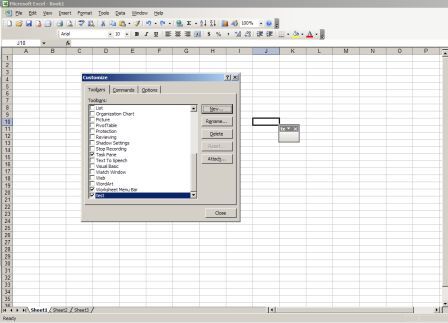
To create a customized toolbar, go to Tools>Customize and the Customize dialog will pop up. Click on the NEW button and under TOOLBAR NAME type in a name for your new toolbar, then click OK
You will see a blank toolbar with the toolbar name at the left displayed on your screen, you will also see the name of your toolbar in the toolbar list within the Customize dialog.
ADDING TO THE TOOLBAR
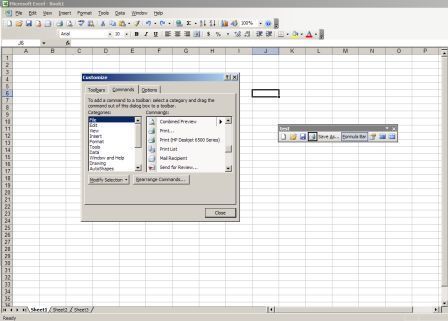
To add a button or a macro to the toolbar, click on the COMMANDS tab of the toolbar, click the category you want on the left of the dialog, then from the Commands box, drag the button that you want to the new toolbar. Macros can also be added in the same way. Click CLOSE when you have made your additions to the toolbar.
If at any time you wish to add, delete or even change the image of the buttons on your toolbar, show the toolbar and go to Tools>Customize, hit the COMMANDS tab and notice that you have a button called REARRANGE COMMANDS. Click this button and you will see the many options available.
ATTACHING A TOOLBAR TO A WORKBOOK
To attach a toolbar to a workbook, go to Tools>Customize and highlight the toolbar you wish to attach to a workbook. Click the ATTACH button and the ATTACH TOOLBARS dialog will pop up with two panes in it, Custom Toolbars and Toolbars in Workbook.
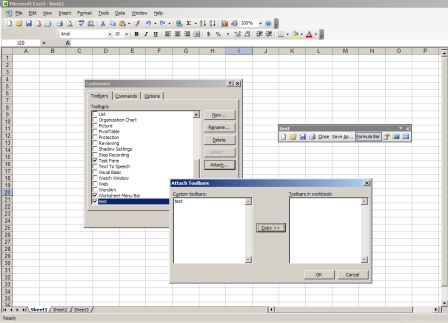
Click on the name of your toolbar in the left pane to highlight it, then select the COPY button. This will copy the toolbar from the left pane to the right pane (Toolbars in Workbook). Select OK to close the ATTACH TOOLBARS dialog, then CLOSE to close the CUSTOMIZE dialog.
Save and close your workbook as normal, but remain in Excel.
Now, when you attach a toolbar to a workbook, the toolbar is actually attached to both the workbook in which you have saved it and in your Excel Workspace. You need to remove it from the workspace. To do this go to Tools>Customize, select the name of the Toolbar, then click the DELETE button and when prompted if you are sure you wish to delete the toolbar, select OK, then CLOSE.
Now open your workbook again, and you should see the toolbar attached.
Remember that if you want a custom toolbar to be available only to your custom workbook or to a workbook based on your custom template, you must delete the toolbar each time the workbook is closed.
If you make any changes to your toolbars, you will need to delete, then re-attach the modified toolbar before saving your workbook.
See also: Index to Excel VBA Code and Index to Excel Freebies and Lesson 1 - Excel Fundamentals and Index to how to… providing a range of solutions and Index to new resources and reference sheets
See also:
| Count Lines in a Cell |
| Count of Each Item in a List |
| Excel VBA Macro - Count Or Sum By Fill Color |
| Count Words in a Cell |
| Create Excel Workbook & Worksheet Templates |
| Excel Custom Number Formats |
Click here to visit our Free 24/7 Excel/VBA Help Forum where there are thousands of posts you can get information from, or you can join the Forum and post your own questions.
Microsoft ® and Microsoft Excel ® are registered trademarks of Microsoft Corporation. OzGrid is in no way associated with Microsoft.