|
|
|
|
|
|
|
|
|
|
| Buy Today, send us your order ID, and claim over $70.00 worth of FREE software |
|---|
First, let us use the diagram to see I detail how XL Fusion works.
At the beginning there are two files: main_data.xls and additional_data.xls
(fig.1).
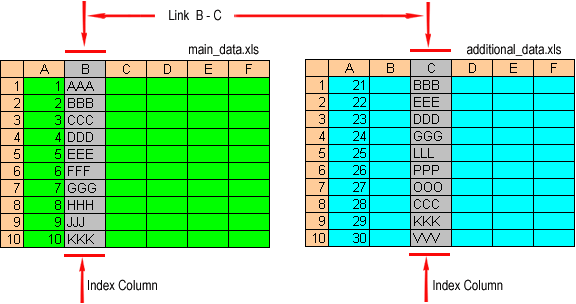
In both files we specify the so-called index columns (they determine the unique position in the worksheet) and the so-called links (a link shows which index column from the first worksheet corresponds to the index column from the second worksheet).
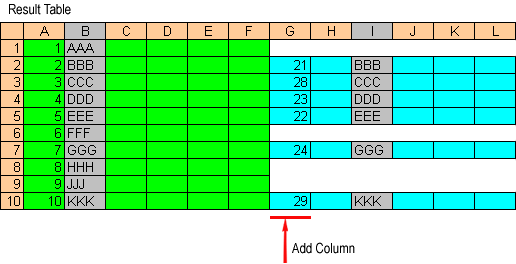
Each file can contain one or more index columns. The resulting file is generated according to the following algorithm - the program takes rows from main_data.xls one by one and searches for the corresponding rows in additional_data.xls (the search criterion is that all pairs of index columns must have the same values).
The result is shown on fig.2.
Important: We recommend that you should back up source files before converting them or save them under a different name (for example, you can save the source file named 'itemslist' with the name 'work_itemslist')
(in both examples the source files are already saved in the
necessary format)
The source files are located in the [XL Fusion_Folder] folder ([XL Fusion_Folder]
is the folder where XL Fusion is installed, by default it is "c:/Program
Files/XL Fusion")
1. Merging two files into one.
Source files:
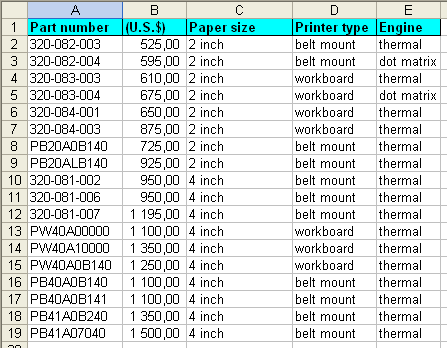
Baselist.xls (fig.3) contains a price list for portable printers with their
main characteristics
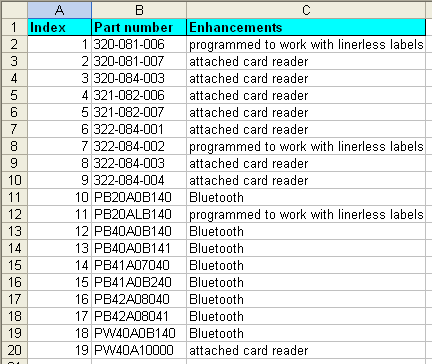
Enhancement.xls (fig.4) contains information about the enhancements of different
printer models
Task:
Add a column named Enhancements to Mainlist.xls and fill it up with
data from Enhancements.xls
Solution:
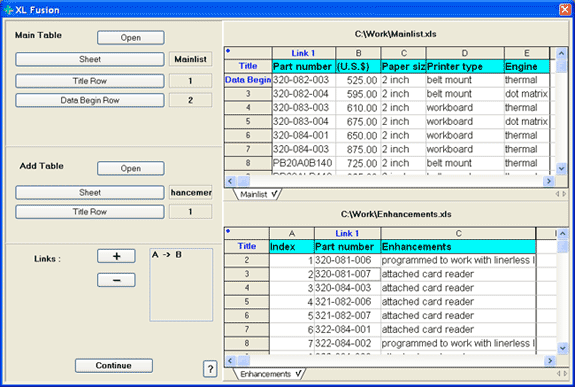
1. Start XL Fusion
2. Click the Select Files button
3. Click the Open button in the Maine Table panel and select Mainlist.xls - now
you can see its contents in the upper worksheet
4. Click the Sheet button in the MainTable panel. Click any cell on the
necessary worksheet. Now you can see worksheet name next to the Sheet button.
5. Click the Data Begin Row button in the Main Table panel, a question mark
appears next to the button. Click any cell in the second row of the upper
worksheet. Now you can see '2' next to the Data Begin Row button.
6. You do not have to specify the Title Row, but if your source files contain
headers and you want to see them in the resulting file, you should specify them.
Click the Title Row button in the Main Table panel and specify the first row.
7. Click the Open button in the Add Table panel and select Enhancement.xls - its
contents is now shown in the lower worksheet.
8. Click the Sheet button in the AddTable panel. Click any cell on the necessary
worksheet. Now you can see worksheet name next to the Sheet button. 9. Click the
Title Row button in the Add Table panel and specify the first row.
10. Now an important step - specifying links. You should specify the columns
whose values determine the connection between your worksheets. In our example,
the column is 'PartNumber' in both Mainlist.xls and Enhancement.xls. Click the
'+' button in the Links panel. You will see '? -> ?' next to it. Click any cell
in the A column of the upper worksheet; Click any cell in the B column of the
lower worksheet. You can now see 'A -> B' in the Links list.
11. All the necessary data is specified now and the parameter window looks like
this (fig.5). Click the Continue button.
11. Click the Start button and specify the folder where the result
will be saved.
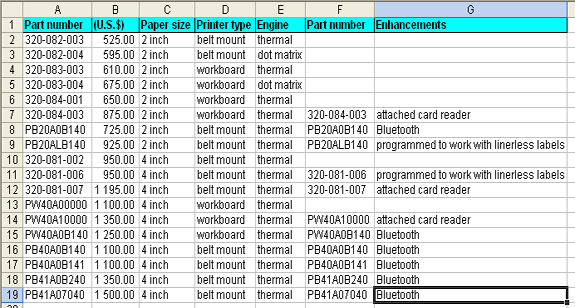
12. The merged file is shown on fig.6. You just have to remove unneeded columns
and the work will be completed.
2. Comparing two worksheets with price lists.
Source files:
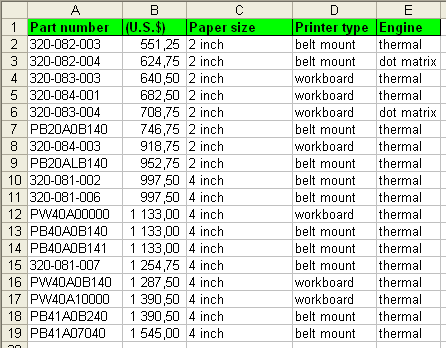
FirstPrice.xls (fig.7) contains a price list for portable printers from the first supplier
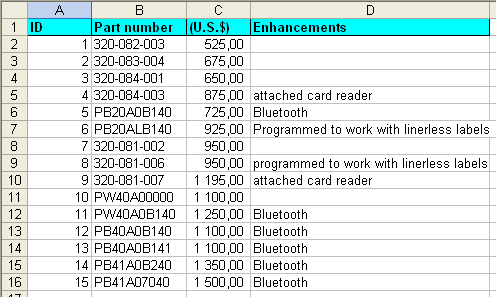
SecondPrice.xls (fig.8) contains a price list for portable printers from the second supplier
Task:
Compare two price lists by getting a worksheet containing Part Number, first
supplier's prices and second supplier's prices
Solution:
1. Start XL Fusion
2. Click the Select Files button
3. Click the Open button in the Main Table panel and select FirstPrice.xls - now
you can see its contents in the upper worksheet
4. Click the Sheet button in the MainTable panel. Click any cell on the
necessary worksheet. Now you can see worksheet name next to the Sheet button. 5.
Click the Data Begin Row button in the Main Table panel, a question mark appears
next to the button. Click any cell in the second row of the upper worksheet. Now
you can see '2' next to the First Data Row button.
6. You do not have to specify the Title Row, but if your source files contain
headers and you want to see them in the resulting file, you should specify them.
Click the Title Row button in the Main Table panel and specify the first row.
7. Click the Open button in the Add Table panel and select SecondPrice.xls - its
contents is now shown in the lower worksheet.
8. Click the Sheet button in the Add Table panel. Click any cell on the
necessary worksheet. Now you can see worksheet name next to the Sheet button. 9.
Click the Title Row button in the Add Table panel and specify the first row.
10. Now an important step - specifying links. You should specify the columns
whose values determine the connection between your worksheets. In our example,
the column is 'PartNumber' in both FirstPrice.xls and SecondPrice.xls. Click the
'+' button in the Links panel. You will see '? -> ?' next to it. Click any cell
in the A column of the upper worksheet; Click any cell in the B column of the
lower worksheet. You can now see 'A -> B' in the Links list.
All the necessary data is specified now and the parameter window looks like this
(fig.9). Click the Continue button.
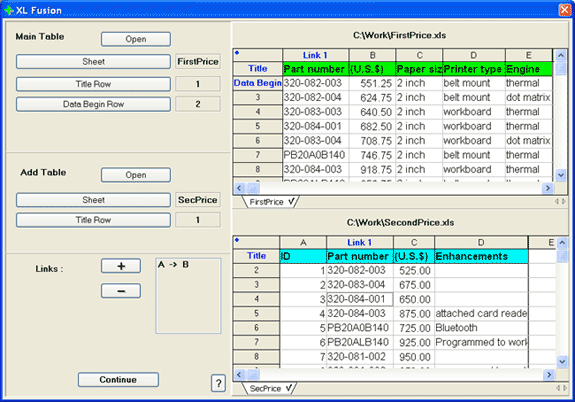
11. Click the Start button and specify the folder where the result
will be saved.
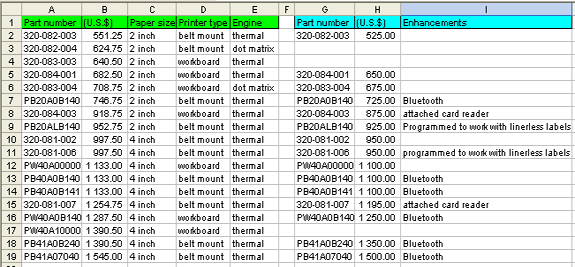
12. The merged file is shown on fig.10. You just have to remove unneeded columns
and the work will be completed.
 <<CLICK TO SEE PRICE
Instant Download and Money Back Guarantee on Most Software
Excel Trader Package Technical Analysis in Excel With $139.00 of FREE software!
Microsoft � and Microsoft Excel � are registered trademarks of Microsoft Corporation. OzGrid is in no way associated with Microsoft