 Back to Excel Newsletter Archives
  Back to Excel Newsletter Archives
EXCEL TIPS AND TRICKS | EXCEL VBA TIPS AND TRICKS
Comparing the Same Workbook
A very handy feature of Excel is its ability to allow you to create a copy of a workbook and compare and work with the copy whilst simultaneously working with and viewing the original workbook. There are two ways in Excel that you can do this.
Creating a New Window
The first thing that needs to be done is to create another instance of the workbook you wish to compare. To do this, first open the workbook you wish to compare, then go to Window>New Window. This will force Excel to create an identical copy of your file. We will use Book1 as an example. The naming convention will change to be Book1:1 and Book1:2 once you create the new copy via Window>New Window.
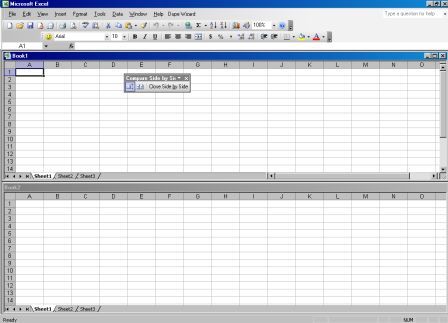
Compare Workbook Command **Note that this is only available in later versions of ExcelNow in Book 1:1, go to Window>Compare Side by Side with Book1:2 and you will see both workbooks displayed one on top of the other with the Compare toolbar also showing on your screen. Remember that any change you make in either copy of the same workbook will be shown in the other copy when you save.
The Compare Workbook toolbar has three buttons on it. The first button (called Synchronous Scrolling if you wave your mouse over it) when pressed in will ensure that both copies will move simultaneously as you scroll through them. The second button Reset Window Position will reset your workbooks to the position they were originally in before you Start ed to Compare. The third button Close Side by Side closes down the Compare option, as does the command Window>Close Side by Side, as does double clicking the Maximise button on either copies, or double clicking the blue title bar of either copy.
The only limitation with the Compare command is that it limits you to comparing two copies of the same workbook only.

Arranging the Workbook
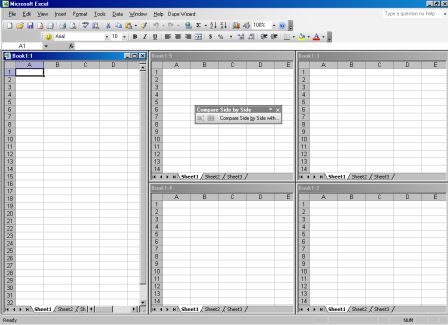
The Arrange option found under the Windows command works in a similar manner to the Compare command, except that it allows greater flexibility. The Arrange command allows you to work with multiple copies of the same workbook. Again using Book1 as an example, go to Window>New Window and create another copy of your workbook. Do it again another three times. You should now have Book1:1, Book 1:2, Book1:3, Book 1:4, Book1:5. Now go to Window>Arrange The Arrange Workbook dialog will pop up with four display options; Tiled, Horizontal, Vertical, Cascade. Notice also the option Windows of Active Workbook at the bottom of the dialog. Only check this if you have other workbooks open. Select one of the four display options (the following screen shot shows the tiled option) and click OK.

You can also show and use the Compare Side by Side toolbar by going to View>Toolbars>Customise and checking Compare Side by Side and clicking Close.
A quick way to close all copies of the workbook at once is to hold down the Shift key on your keyboard and select the File option from the worksheet menu bar. You will see that the option Close changes to Close All when the Shift key is held down. Select Close All to close all copies of the workbook at once. You will be prompted to save if you have made changes.
There are many times in Excel VBA that we are required to gather information from a user. Probably the most frequent method of doing is via a message box, that is;
Sub UserInput()Dim iReply As Integer iReply = MsgBox(Prompt:="Do you wish to run the 'update' Macro", _ Buttons:=vbYesNoCancel, Title:="UPDATE MACRO") If iReply = vbYes Then Run "UpdateMacro" ElseIf iReply = vbNo Then 'Do Other Stuff Else 'They cancelled (VbCancel) Exit Sub End If End Sub
As you can though, the message box approach only allows for pre-determined responses. To actually allow the user to enter some text, number or even a formula we can use the InputBox Function. The syntax for the InputBox Function is;
InputBox(prompt[, title] [, default] [, xpos] [, ypos] [, helpfile, context])
It is rare that you will need to use [, xpos] [, ypos] or [, helpfile, context]. See Excel help for details on these. It should also be noted that, the InputBox Function returns a String only when used in this way. (more on another way soon).
Ok, lets assume we need to gather the name of the user and do some stuff depending on that name. The macro below will achieve this.
Sub GetUserName()Dim strName As String strName = InputBox(Prompt:="You name please.", _ Title:="ENTER YOUR NAME", Default:="Your Name here") If strName = "Your Name here" Or _ strName = vbNullString Then Exit Sub Else Select Case strName Case "Bob" 'Do Bobs stuff Case "Bill" 'Do Bills stuff Case "Mary" 'Do Marys stuff Case Else 'Do other stuff End Select End If End Sub
Note the use of the Select Case Statement to determine the name the user supplies.
Application.InputBox
When we precede the InputBox Function with "Application" we get an InputBox Method that will allow us to specify the type of info that we can collect. Its Syntax is;
InputBox(Prompt, Title, Default, Left, Top, HelpFile, HelpContextId, Type)
As you can see, the Prompt, Title and Default are the same as in the InputBox Function. However, it is the last argument "Type" that allows us to specify the type of data we are going to collect. These are as shown below;
Type:=0 A formula
Type:=1 A number
Type:=2 Text (a string)
Type:=4 A logical value (True or False)
Type:=8 A cell reference, as a Range object
Type:=16 An error value, such as #N/A
Type:=64 An array of values
We have already covered a String being returned so lets look, what I believe, to be the most useful. That is, Type 8 & 1. The code below shows how we can allow the user to specify a Range Object.
Sub RangeDataType()Dim rRange As Range On Error Resume Next Application.DisplayAlerts = False Set rRange = Application.InputBox(Prompt:= _ "Please select a range with your Mouse to be bolded.", _ Title:="SPECIFY RANGE", Type:=8) On Error GoTo 0 Application.DisplayAlerts = True If rRange Is Nothing Then Exit Sub Else rRange.Font.Bold = True End If End Sub
Note the use of both, On Error Resume Next and Application.DisplayAlerts = False. These stop Excel from trying to handle any bad input from the user, or if they Cancel. Take the lines out, run the code and click Cancel, or specify a non valid range and Excel will bug out in the case of Cancel.
Let's now look at how we can collect a numeric value from a user.
Sub NumericDataType()Dim lNum As Long On Error Resume Next Application.DisplayAlerts = False lNum = Application.InputBox _ (Prompt:="Please enter you age.", _ Title:="HOW OLD ARE YOU", Type:=1) On Error GoTo 0 Application.DisplayAlerts = True If lNum = 0 Then Exit Sub Else MsgBox "You are " & lNum & " years old." End If End Sub
Again, we take over the possibility of the user electing to Cancel, or entering a non-numeric value. If they enter anything that is not numeric and click OK, they are taken back to the InputBox Method with their entry highlighted.
Unlike the InputBox Function, we can combine different Types for the InputBox Method and take action based on their data type. See example.
Sub Numeric_RangeDataType()Dim vData On Error Resume Next Application.DisplayAlerts = False vData = Application.InputBox _ (Prompt:="Please select a single cell housing the number, " _ & "or enter the number directly.", _ Title:="HOW OLD ARE YOU", Type:=1 + 8) On Error GoTo 0 Application.DisplayAlerts = True If IsNumeric(vData) And vData <> 0 Then MsgBox "You are " & vData & " years old." Else Exit Sub End IfEnd Sub
Software Categories ![]() Search Software
Search Software
Excel Add-ins || Excel Training || Excel Templates || Employee Scheduling Software || Excel Password Recovery and Access & Word etc|| Excel Recovery and Access & Word etc || Financial Software || Financial Calculators || Conversion Software || Construction Estimating Software || Drilling Software || Real Estate Investment Software || Time Management Software || Database Software || Neural Network Software || Trading Software || Charting Software || Windows & Internet Software || Barcodes Fonts, ActiveX, Labels and DLL's || Code Printing Software || Outlook Add-ins
Microsoft ® and Microsoft Excel ® are registered trademarks of Microsoft Corporation. OzGrid is in no way associated with Microsoft.