![]() If you cannot read HTML in your email please go here: http://www.ozgrid.com/News/Archive.htm
If you cannot read HTML in your email please go here: http://www.ozgrid.com/News/Archive.htm
You are more than welcome to pass on this newsletter to as many people as you wish. Or even upload it (as is) to your Web site!To no longer receive our newsletter, send an NEW email with the exact words "action: Unsubscribe" in the body of the email, or click here .Microsoft and Microsoft Excel are registered trademarks ofMicrosoft Corporation Read this issue and past issuesonline here :
PLEASE DO NOT REPLY TO THIS ADDRESSAll Excel Templates Normally an 80% saving at $250.00.October Super Special $127.00! Best Value on the WWW More Hot Specials!
| The Excel Add-ins Shop . The Largest Collection Around All With a 30 Day Money Back Guarantee! The Excel Template Store lots of new Templates added! Excel on the Web HTML, JavaScript, ASP etcThe Software Store For all Business and Financial and Trading Related Software. Check out the range of trading software using neural networks. Construction and Estimating Excel Add-ins Learn Excel From Those That Develop it, OzGrid . We teach from experience not a manual! Downloadable, Online or E-mail for all levels. Big Specials on all our Downloadable Excel Training FREE 24/7 Support For You, Or Your Business: OzGrid Excel Forum An information superstore |
We Recommend SmartDraw for Flowcharts
| |
What's New at OzGrid | Excel Tips and Tricks | Excel VBA Tips and Tricks
If you would like 20% off any of ourExcel or Excel VBA Training including already discounted bundles and Downloadable then simplyemail me and let me know the course and training delivery method i.e. Online, e-mail or Downloadable
September came and went and now we are nearly half way through October, and finally getting some good weather. As usual, we have had a hectic month, mainly due to the huge undertaking of the Excel Hacks book we are writing forO'Reilly Publishing . The book features clever and non-obvious solutions to challenging problems and is aimed at intermediate-level power users.
We are required to provide 100 Hacks for the book, and at present we are on Hack #34 and we are still married and on speaking terms, so things are looking pretty rosy. We have provided O’Reilly with the first draft of 10 Hacks and are waiting for their comments, so we will fill you in on our feedback from them next month.
Lecturing work has been very busy for us in our local area, mainly due to the two week school holiday break that students are on the moment. Our local College of Tertiary Education hires its computer rooms to industry clients during the school holidays, so we have been taking full advantage of this and using the rooms for group training.
That's it for this month, enjoy the newsletter and remember tocheck out any past issues here
Create spreadsheets like a pro. Subscribe to Working Smarter with Microsoft Excel Affiliate Site
When working on a table within Excel, it is often useful to apply Excel’s Autofilter criteria so that we can display only the data that meets a criteria we specify. There are times, however, when the criteria we need cannot be gleaned using the standard AutoFilters. In these cases we need to use Excel’s Advanced Filter.
As a quick refresher for those who are not familiar with using Excels Advanced Filter, your table must be set up in a classic table format. Below are what I consider to be good practice when setting up ANY table of data within Excel.
When using Excels Advanced Filter, you will need a copy of your tables column headings somewhere above your data. This is one reason why there should always be at least three spare rows above your table of data. To ensure that your headings are exactly the same and will remain so regardless of whether you change your column headings or not, always reference the column headings with a simple reference Formula such as =A4, where A4 contains a column heading. Copy this across for as many column headings as you have in your table. This will ensure that our criteria headings for our Advanced Filter are dynamic. It is directly below these copied headings that we place our criteria for our Advanced Filter to use. For more details on this, see the Excel Help under Advanced Filters Criteria.
One point to keep in mind when using Advanced Filter is that two or more criteria placed directly underneath the applicable heading, is using an OR statement. If we wish to use an AND statement, we would need to have a copy of the column heading twice side by side and our criteria under each of these headings. The two figures below show how to use both the OR operator and the AND operator to filter your data.
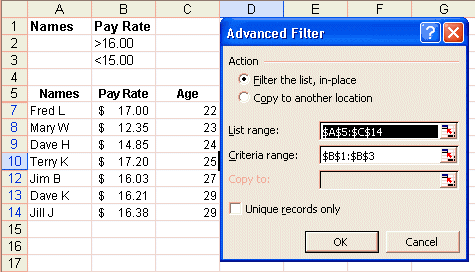
Using Advanced Filter with OR to show only those that have a pay rate greater than $16.00 OR less than $15.00.
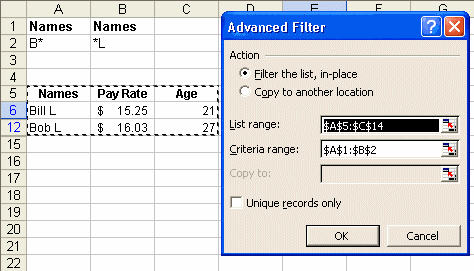
Using Advanced Filter with AND to show only those that have a name Starting with B AND ending with L
Both the above examples are fairly simple uses of the Advanced Filter and could also be done via the AutoFilter if needed.
We will now look at some examples of Advanced filter where the use of AutoFilter would not be possible. It is important to note that whenever we use a Formula for our criteria, we must not use a heading above our criteria which is the same as one within our table. In other words, the opposite of when we use a non-Formula criteria. It is also important to understand that any Formula that we do use should return either TRUE or FALSE.
For example, if we had a list of numeric data in column A and our list began in Cell A5 (with A4 being our heading) and we needed to extract out all of the numbers in that list that were greater than the average of that list, we would use a criteria such as shown below:
=A5>AVERAGE($A$5:$A$500)
If this criteria was placed in Cell A2, our criteria range would be $A$1:$A$2, but $A$1 could not contain the same heading as the one our list uses. It must be either blank or a different heading altogether. It is very important to note here that our range for the Average Function is absoluted, whilst our reference to Cell A5 is a relative reference. This is needed as when we apply the Advanced Filter, Excel will note that A5 is a relative reference and move down the list one entry at a time and return either TRUE or FALSE. If it is TRUE, then it knows it needs to be extracted, if it is FALSE, then it does not meet the criteria, and therefore will not be shown.
We can take this to another level. Assume we have a long list of names, in the range $A$5:A$500, A4 being the headings, many of which are repeated numerous times. We have been given the task of extracting out the names from the list that appear more than once. To do this we would again need to use Advanced Filter and a Formula as our criteria.
This time, our criteria (formula)would be as shown below:
=COUNTIF($A$5:$A$500, A5)>1
Once we applied Advanced Filter to this and used the Copy to another location: option, our newly created list would contain all of the names that appeared more than once in our list. Many of these names will be repeated numerous times, but we can then quite easily filter this new list again with the Advanced Filter and this time select Unique Records only. This would then give us a list of names that appear in our list more than once.
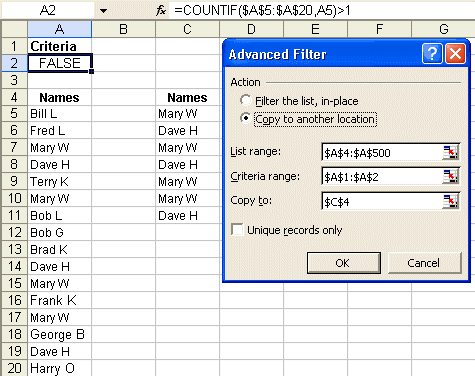
Using Advanced Filter to extract out Names from a list that appear more than once.
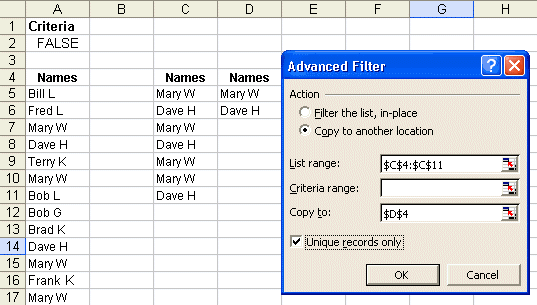
Using Advanced Filter on the extracted list of names to filter down to show each name only once ie; Unique Records Only
One common question that is often asked about Advanced Filters is; how can I force Excel to filter my data by the exact criteria that I have given? For example, if your criteria was; Dave and you did an Advanced Filter on a long list of names, it would not only show the name Dave, but also names such as Davey, Dave J, Dave K, etc. In other words, any word that begins with the letters Dave will be considered a match for the criteria. To force Excel to find exact matches, eg; in this case only find the name Dave, you enter your criteria as =”=Dave”.
Excel, Word, Access Password Recovery ||Corrupt Excel, Word, Access File Recovery
| GO TO Excel Add-ins, Training and Templates ... Business and Charting Software ... |
Into Excel and Excel VBA?Our 4 Most Popular Bundled Savings
This month I thought we would look at what is arguably the most common problem in Excel VBA for newcomers. That is, how do I find the end of a range of cells in without knowing its parameters? Or basically working with ranges in general. Let's face it, there is no too much VBA code used in a Workbook that does not include a Range.
Ok, before we get into details we should first understand about the Range Collection. The Range Collection can represent a single cell, an entire row, an entire column, a Selection (of cells) that contains one or more contiguous blocks of cells, or a 3-D range (a range that spans more the one Worksheet). It is from the Range Collection that we get the Range Object. Remember a Collection is simply an Object that houses a group of similar and/or related Objects.
So just how do we find the parameters of a specified range? Some of you are no doubt aware that we can do this on a Worksheet without VBA by selecting the first cell in a list then holding down the Ctrl key, push the arrow key in the direction you wish to find the last cell. For example, if you had a long list in Column A and you wanted to find the first blank cell in that list you would select A1, hold down the Ctrl key and then push the down arrow.
We can do the exact same in VBA as shown below
Find the last used cell, before a blank in a Column:Sub LastCellBeforeBlankInColumn() Range("A1").End(xldown).Offset(1,0).SelectEnd SubNote that we Offset by one row, this is so we have the blank cell and not the used cell directly above. Now, what you should understand is thatRange("A1").End(xldown) Or Range("A1").End(xldown).Offset(1,0)returns a Range Object and while I have used the Select Method in the example, there would most likely be no need in most cases. For example, if we were wanting to add a name to the Range Object returned we could simply use:
Find the last used cell, before a blank in a Column and add a nameSub LastCellBeforeBlankInColumn() Range("A1").End(xldown).Offset(1,0)="Dave"End SubIf, in the above example, the Range Object returned was "A100" we are simply working with that particular Range Object via Range("A1").End(xldown).Offset(1,0). It is no different to using Range("A100") or Cells(100,1) etc
TIP: It is more efficient to use code like: Range("A1").End(xlDown)(2, 1) = "Dave" This makes use of the Item Property for the Range returned and returns a Range that is at a specified offset i.e. 2,1. The Syntax is: Item(RowIndex, ColumnIndex) Note that we use 2 for the RowIndex, this is because 1 would simply return the same cell as Range("A1").End(xlDown)
This all works out nicely if our list was Contiguous (no blanks in the list) but what happens if we know we have blanks in our list yet we wish to add the name to the end of the list. In this case we need to come up from the bottom on the column (Row 65536) and locate the cell.Find the very last used cell in a Column:Sub LastCellInColumn() Range("A65536").End(xlup)(2,1)="Dave"End SubSo easy when you know how isn't it?Ok, I know that leaving our examples at this will get me flooded with emails asking me "How do I add a Sum formula to the end of my list that sums all the numbers above?" So here is how:
Sub AddTotal()Dim rRange As RangeSet rRange = Range("A1", Range("A65536").End(xlUp))Range("A65536").End(xlUp)(2, 1) = "=Sum(" & rRange.Address & ")"End SubYou can use Edit>Go to-Special-Last cell to try and find the last cell in the active sheet, but it is not very reliable. The reasons are two-fold:
1. The last cell is only re-set when you save. This means if you enter any number or text in say, cell A10 and A20 of a new Worksheet, then delete the content of A20, the Edit>Go to-Special-Last cell will keep taking you to A20, until you save.
2. It picks up cell formatting. Let's say you enter any text or number in cell A10 and then enter a valid date in cell A20 of a new Worksheet. Now delete the date in cell A20 and save. The Edit>Go to-Special-Last cell will still take you to A20. This is because entering a date in A20 has caused Excel to automatically format the cell from its default "General" to a Date format. To stop from going to A20 you will have to use Edit>Clear>All and then save.
So when using VBA you cannot rely on:
Range("A1").SpecialCells(xlCellTypeLastCell).SelectBelow are some methods that will find the "Last Row", "Last Column" and the "Last Cell" Find the last used Row on a Worksheet:
Sub FindLastRow()Dim LastRow As Long If WorksheetFunction.CountA(Cells) > 0 Then 'Search for any entry, by searching backwards by Rows. LastRow = Cells.Find(What:="*", After:=[A1], _ SearchOrder:=xlByRows, SearchDirection:=xlPrevious).Row
MsgBox LastRow End IfEnd Sub
Find the last used Column on a Worksheet:Sub FindLastColumn()Dim LastColumn As Integer If WorksheetFunction.CountA(Cells) > 0 Then 'Search for any entry, by searching backwards by Columns. LastColumn = Cells.Find(What:="*", After:=[A1], _ SearchOrder:=xlByColumns, SearchDirection:=xlPrevious).Column
MsgBox LastColumn End IfEnd Sub
Find the very last used cell on a Worksheet:
Sub Demo() Cells.Find(What:="*", After:=[A1], SearchDirection:=xlPrevious).SelectEnd Sub
OR
Sub FindLastCell()Dim LastColumn As IntegerDim LastRow As LongDim LastCell As Range If WorksheetFunction.CountA(Cells) > 0 Then 'Search for any entry, by searching backwards by Rows. LastRow = Cells.Find(What:="*", After:=[A1], _ SearchOrder:=xlByRows, SearchDirection:=xlPrevious).Row 'Search for any entry, by searching backwards by Columns. LastColumn = Cells.Find(What:="*", After:=[A1], _ SearchOrder:=xlByColumns, SearchDirection:=xlPrevious).Column
MsgBox Cells(LastRow, LastColumn).Address End IfEnd Sub
Until next month, keep Excelling!
Office Ready Professional 3.0 |High Impact e-Mail 2.0 |Office-Ready Business Plans |Office-Ready Marketing Plans |e-Marketing Suite |Office Policy Manual |Ultimate Everyday Calculator |Ultimate Financial Calculator |Ultimate Marketing Calculator |Template Zone Home Page |Office Ready Stuff It |Ultimate Loan Calculator
You are more than welcome to pass on this newsletter to as many people as you wish. Or even upload it (as is) to your Web site!
To no longer receive our newsletter, send a NEW email with the exact words "action: Unsubscribe" in the body of the email, or click here .
Microsoft and Microsoft Excel are registered trademarks of Microsoft Corporation
Read this issue and past issues online here :