|
|

|
|
|
|
|
Excel enables you to have multiple workbooks showing simultaneously, and to have a customized view of your workbooks arranged in different windows. Then you can save your view workspaces as .xlw files and use them when it suits you.
Works with all versions of Excel
Sometimes when working in Excel, you might need to have more than one workbook open on your screen. This makes it easier to use or view data from multiple workbooks. The next few paragraphs describe how to do this in a neat and organized way.
First, open all the workbooks you will need.
To open more than one workbook at a time, select the Office button>Open...,
press the Ctrl key while selecting the workbooks you want to open, and then
click Open. (Users of pre-2007 versions select File>Open)
From any of the workbooks (it doesn�t matter which one), select View>Arrange All under Windows options. (for versions earlier than 2007, select Window>Arrange). If �Windows of active workbook� is checked, uncheck it, and then select the window arrangement you prefer and click OK.
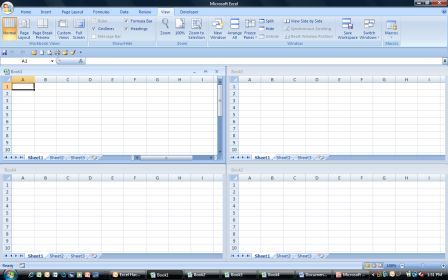
If you select Tiled, you will be presented with your workbooks in a tiled fashion, as shown with blank workbooks in Figure 1-1.
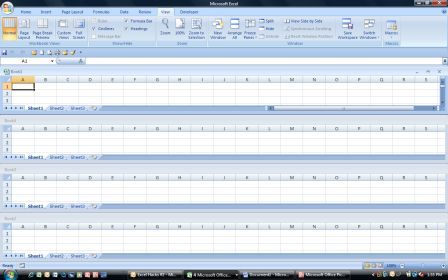
Selecting Horizontal gives you a view of your workbooks in a single stack, one on top of the other, as in Figure 1-2.
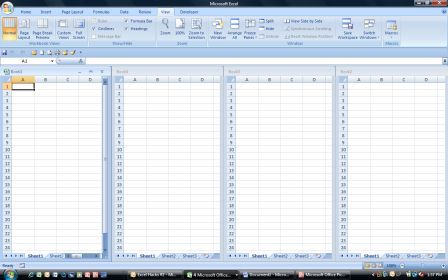
Checking the Vertical option will place all your open workbooks side by side, as shown in Figure 1-3.
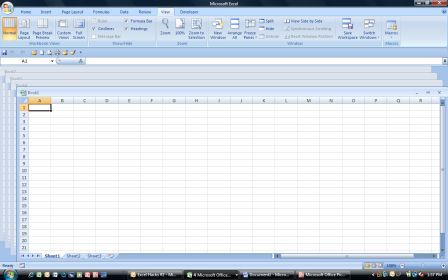
Finally, as shown in Figure 1-4, selecting the Cascade option will layer all your open workbooks one on top of the other.
Once your workbooks are displayed in your preferred view, you can easily copy,
paste, drag-and-drop, etc., between them.
If you think you might want to return to a view you created, you can save this preferred view as a workspace. To save a workspace, simply select the Save Workspace choice under Window options (File>Save Workspace in previous versions), enter the workspace�s filename in the File Name box, and click OK. When saving your workspace, the file extension will be .xlw rather than the standard .xls. To restore your Excel workspace to one full window of a particular workbook, just double-click the blue title bar appearing on any one of your workbooks. You can also click the Maximize button on any of the windows in your workspace. Close your workbooks as usual when you�re finished.
Whenever you need to open those same workbooks, simply open the *.xlw
file, and the view you initially set up will be magically restored for all
workbooks. If you need to open just one of these workbooks, open the file as
usual. Any changes you make to the workbooks in the *.xlw file will be saved
automatically as you close the workspace as a whole, or you can save workbooks
individually.
If you spend a small amount of time setting up some custom views for repetitive
tasks that require multiple open workbooks, you�ll find that these tasks become
easier to manage. You might decide to use different views for different
repetitive tasks, depending on what the task is or how you�re feeling that day.
This Month I would like to work with array and their elements. In
case you are not aware, array elements start at Zero and NOT 1. You can force
array elements to start at 1 by using;
Option Base 1
at the very top of the Module.
FILLING ARRAYS
To fill an array we can use 1 of 2 methods.
Sub FillArray1()
'Can store up to 10 string elements
Dim strArray(9) As String
Dim lLoop As Long

    For lLoop = 0 To 9
        If lLoop = 0 Then
            'Choose doesn't work with Zero
            strArray(lLoop) = "Zoo"
        Else
            strArray(lLoop) = Choose(lLoop, "Farm", "Paddock", "Sheep", _
                        "Cow", "Bird", "Mice", "Chicken", "Fence", "Post", "Lamb")
        End If
    Next lLoop

    'Loop from 0 to UpperBound array element. 0-9
    For lLoop = LBound(strArray) To UBound(strArray)
       MsgBox strArray(lLoop)
    Next lLoop
End Sub
The second method requires that we use a Variant for our Array as we have both numbers and text;
Sub FillArray2()
Dim strArray() As Variant
Dim lLoop As Long

            strArray = Array("Zoo", 2, "Paddock", "Sheep", _
                        "Cow", "Bird", 3, "Chicken", "Fence", "Post", "Lamb")

    'Loop from 0 to UpperBound array element. 0-9
    For lLoop = LBound(strArray) To UBound(strArray)
       MsgBox strArray(lLoop)
    Next lLoop
End Sub
Or, if we want to put a range of cells into an Array;
Sub ArrayOfCells()
Dim vArray()

'Transpose IF range is vertical
vArray = Application.Transpose(Range("A1:A10"))

'Display each element in our array
For lLoop = LBound(vArray) To UBound(vArray)
  MsgBox vArray(lLoop)
Next lLoop

End Sub
Next Month we will look at how to output Arrays to Ranges.
Excel Dashboard Reports & Excel Dashboard Charts 50% Off
Become an ExcelUser Affiliate & Earn Money
Microsoft � and Microsoft Excel � are registered trademarks of Microsoft Corporation. OzGrid is in no way associated with Microsoft